17th Feb 2018
Added post (30) in the 'Personal Development' section.
This give more detail for those starting out and may add clarification for advanced players too.
Getting Started
Start by blowing a steady note with your normal embouchure, and then slowly move the tongue forward towards the bottom lip. If the sound stops, then retract the tongue and start again. Keep doing this until you can maintain a sound with the tongue resting on the bottom lip. Once you get used to producing a sound with the tongue in this new position, leave the tongue in place after producing a sound, and then try starting a note by just blowing.
The Superchops Embouchure
The embouchure is created by first gently placing the underside of the tongue tip section (all the way across, and about 3mm in from actual tip) onto the cutting edges of the bottom teeth. Then pull the bottom lip up and slightly over the bottom teeth to allow the whole of the tip end of the tongue (all the way across) to rest onto the bottom lip, still keeping the underside portion of the tip lightly touching the bottom teeth. Then curl the remaining part of the tongue upward towards the roof of the mouth and into the back of the top teeth. You need to close the lips around the tongue into a pucker but the lips do not touch each other, they leave a gap for the curled tongue to protrude slightly and so allowing the underside of the top lip to make contact with it. It is only the top lip that vibrates against the tongue when producing a sound. The tip section of the tongue never leaves contact with the bottom teeth (cutting edge only - not behind bottom teeth) and the bottom lip. Start by trying to buzz a sound (Callet calls this Spit Buzz); hence without the instrument or mouthpiece.
Please note that when you play, the back of the tongue will drop even further down from the roof of the mouth to allow the air to freely pass over it. This position will be lower in the mouth when playing in the low register, and a little higher (creating more tongue curl and air compression) for the upper register. It should be noted however that it is the front section of the 'tongue wedge' pushing into the top teeth and upper lip that creates the main air compression.
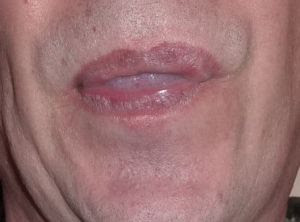
I have added some scary pictures that show the formation of my embouchure. The first picture has the lips opened up to show the position of the tongue wedge and open teeth. The second picture shows the lips closed around the tongue in the playing position. You can see the tongue protruding over the pulled in/up bottom lip, and also pressing into the top lip. The third picture shows the position of the mouthpiece on my lips while actually playing.

Please note that when you play, the back of the tongue will drop even further down from the roof of the mouth to allow the air to freely pass over it. This position will be lower in the mouth when playing in the low register, and a little higher (creating more tongue curl and air compression) for the upper register. It should be noted however that it is the front section of the 'tongue wedge' pushing into the top teeth and upper lip that creates the main air compression.
I have added some scary pictures that show the formation of my embouchure. The first picture has the lips opened up to show the position of the tongue wedge and open teeth. The second picture shows the lips closed around the tongue in the playing position. You can see the tongue protruding over the pulled in/up bottom lip, and also pressing into the top lip. The third picture shows the position of the mouthpiece on my lips while actually playing.


My Personal Development - A Point By Point 7 Year Account Using Superchops
These numbered notes were made over a 12 year period, and are a time ordered list right through to the present day. They were written as an instruction/reminder to myself to ensure I did not forget the things that worked best for me. As you read through the list you will notice some contradiction as I discover new methods that have allowed me to progress further from that point in my development.
(The list is ordered with the most recent at the top to make it quicker and easier to see the latest additions).
30) Here is a bit more detail about the embouchure to help those starting out as well as more advanced players.
29) Made significant progress recently by working more on my articulation, particularly by practicing playing groups of 5 notes (5 articulations on each individual scale tone) as fast as I can, working up the scale in semi-tones from bottom C up to top (high) C. The notes must be practiced with maximum attack and as fast as possible. This ensures that the tongue is placed in the optimum position, otherwise both the speed and attack quality will be affected. Basically, if the tongue recedes, rather than staying forward, the speed and attack quality will suffer. Playing groups of 5 (or no more than 5) is important because the tongue has a tendency to recede as you articulate continuously. By practicing groups of only 5 notes (or no more than 5), the tongue can be reset (to correct forward position) at the start of each group of 5 notes, thus ensuring the correct position is maintained; and achieves the desired re-enforced learning. I chose 5 notes rather than 4 because a typical phrase when playing pieces of music is often 4 notes that then lead into the next phrase i.e. ta,ta,ta,ta, taa.
So, when you practice this exercise always ensure you pay attention to starting each phrase with the tongue pushed forward. Listen to the attack quality, and work to achieve consistency and speed as you ascend. It will be harder at first to achieve the same quality and speed for the higher notes of the scale, but with continued practice I promise this will get better and better, as well as your overall performance sound.
28) I would like to re-emphasise the importance of the note made earlier in post 22. Hence to curl the bottom lip up over the bottom teeth. I have found that not only the upper, but also the lower register is significantly improved by doing this. Hence, always strive for this position of the bottom lip throughout the complete range of the instrument. Your sound will become more powerful and centred, with an improvement in overall intonation (high and low), as well as endurance. In particular, an improvement in upper register endurance and clarity will result.
27) As I have progressed more with this wonderful technique, I have found that by far the best exercise without an instrument is to practice lots of Spit Buzzing. Practice single tonguing with emphasis on the “Tongue Stop” as well as double tonguing ensuring smooth double tongue articulation. In addition, practice slurring up as high as you can by creating maximum tongue curl and opening the teeth. This will greatly increase the tongue strength and give you a more powerful upper register. Spit Buzzing is the only non instrument exercise I do now.
26) The Tongue Stop - It has become increasing clear to me as I have progressed with the Superchops embouchure of the importance of the correct use of the tongue for stopping each note; what is known as the Tongue Stop. The end of every note should be performed by pushing the tongue forward to stop the air flow, not by stopping the air with the lungs. The lungs should maintain abdomen air pressure at all times, with the tongue acting as the outlet valve for both starting and stopping the flow. It is all too easy to overlook this technique when developing the Superchops method, but when correctly applied, it will greatly enhance articulation power, accuracy, and speed, as well as pitch control.
Practice slow articulation with a reasonable gap between notes to get the feel of the tongue pushing hard forward to stop each note. The tongue remains in this position until the start of the next note when it releases to form a precise “pop” articulation strike. The tongue will ache with the effort and quickly get stronger the more you practice. Once you have developed the correct feel, gradually increase the speed, but always go back to practicing slowly to re-enforce the learning and feel of this most important articulation method.
25) I have discovered that the tongue strength is greatly enhanced, as well as general pitch accuracy, by practicing starting each note by just blowing, hence no articulation. Playing in this way (just a simple scale with separated notes; played quietly) forces you to start each note with the tongue firmly forward, and is excellent for developing the correct feel of the forward tongue during playing. This is another exercise that makes my tongue ache and feel very thick after playing, which proves that it is excellent as a tongue strengthening work out. I have only been practicing this way for two weeks and have already noticed a significant improvement in both my endurance and pitch accuracy.
24) I slightly chipped one of my teeth recently, and found that my tongue was getting sore when I played (ok now). This made me realise that I am actually lightly placing the tip of the tongue on top of the bottom teeth, and curling it forward onto the bottom lip. My bottom teeth are hence acting as both a support and anchor for the underside of the tongue tip and the bottom lip is pulled in so that the curled tongue rests on top.
I believe my tongue has migrated over time to this position as I have improved, and that it helps with the accuracy and speed of articulation.
Interestingly, my embouchure is now exactly the same as shown in Jerome Callet’s Master Superchops DVD embouchure diagram (disc 2), which clearly shows the tongue tip curling down onto the top (cutting edges) of the bottom teeth.
23) In addition, or instead of that described in (9) above, I have now found a new way to strengthen the tongue (and bottom lip) without the need for an instrument or mouthpiece. Pull the bottom lip up over the bottom teeth, curling into the mouth as much as possible. Then place the tongue on top of the bottom lip and form the Superchops embouchure. Keep the teeth apart, and curl the tongue as much as possible, pushing it up into the roof of the mouth, and forward against the inside of the top teeth, as well as down hard onto the bottom lip. Hold in this position to make the tongue and bottom lip muscles ache. I have found that this even helps when performed immediately before playing, and helps to develop a powerful upper register.
22) When ascending into the upper, and extreme upper register, pull (curl) the bottom lip hard up over the bottom teeth. This helps to keep the teeth wide open when the tongue is generating maximum curl, and creates a very powerful sound.
21) Breakthrough - Found that my tongue was retracting too much during articulation. Practice playing long notes that run into each other ensuring as smooth as possible. Then play taa ta taa ta taa rhythm to develop articulation speed, keeping the gap between the notes to a minimum. This works really well. Makes the tongue ache which shows it is working hard.
20) As well as practising double tonguing described above, practice very short sharp tonguing, creating a pop sound. Do this as fast as possible (triplets) making sure each note is properly centred. This is good for developing attack and speed, also helps develop the tongue strength.
19) Breathing – (I appreciate there are other well proven breathing methods, but this worked for me). Very important to breath properly from the lower abdomen. Practice by taking deep breaths just before the start of playing, tense the lower abdomen muscles used to push the air through the instrument and continue to feel the muscles pushing during playing. Never use the upper chest muscles. Do breathing exercises expelling as much air as possible while using the lower abdomen muscles. Concentrate on not taking quick extra breaths from the upper chest, must only do this from the lower abdomen. You must feel the stomach extend when taking quick extra breath. Practice taking fast breaths to develop the technique.
18) Use double tonguing as a means of developing a good forward tongue position. Practice with double-tonguing as much as possible while continually forcing the tongue forwards. Concentrate on minimising the amount of tongue movement between notes whilst articulating very slowly. Gradually increase the speed, but only when very smooth articulation is obtained where the notes almost run into each other. Start on bottom C playing 4 notes the same and then ascend the scale, 4 notes each. Move up and down the scale like this for as long as possible, rest and then continue. The tongue will start to feel very thick after just a few days, and will quickly become strong and able to support and further develop the correct Superchops forward position. Always strive for maximum forward position with sufficient curl to feel the roof of the mouth with the back of the tongue and the inside of the top teeth with the tongue centre.
17) When double-tonguing, also practice by tonguing as hard as possible to give a solid pop sound. When ascending, push the tongue forward the same as when slurring upwards so as to maintain a smooth sound and perfect pitch. Practice by slurring first and then, while the feeling of slurring is fresh in the mind, double tongue the same phrase, concentrating on the same feel; forward movement of the tongue.
16) Practice tonguing in groups of 4 articulated notes with accent on first of each 4. Gradually build up speed, using first of 4 notes as means of driving forward in speed.
15) Practice the above by playing long low notes (F above bottom C) making sure the tongue is kept as far forward as possible. Gradually escalate up the scale playing long notes with tongue as far forward as possible pushing hard against the top teeth. This will greatly increase the strength of the tongue.
14) To get tonguing smooth and fast practice quiet tonguing with absolute minimum gap between notes so they almost run into each other. This ensures minimal tongue movement between notes and improves smoothness and speed. Do the same with double tonguing keeping the articulation soft. This is best achieved by keeping tongue lightly touching top teeth at all times. Don’t let it recede or it will make smooth double tonguing much more difficult. Practice keeping point of contact with the top teeth as far forward as possible; somewhere around the middle of tongue.
13) Keep the sides of the mouth pulled in at all times producing maximum pucker. This makes the upper register easier and improves tonal quality. Practice long quiet G’s (below middle C).
12) Breakthrough – Keep tongue position as above and practice slurring up by just curling the tongue; pushing against the inside of the top teeth as described above. Use the same valves e.g. 1&3 to slur right up into the top register. Trap the back of the tongue between the back teeth like an anchor making it firmer. Practice with the tongue in this position in all registers. I notice the articulation got much faster and the flexibility much better as only the front part of the tongue moves. Almost managed to slur up to a super C !!
11) Breakthrough – Make sure the tongue position is such that the curled tongue presses against the inside of the top teeth AND the gums. I should feel the gum when articulating, which ensures that the tongue is well forward and very curled. This gives much better attack and faster articulation. The Spit Buzz sounds much more like Callet when doing this.
10) Practice Spit Buzzing all the time and make sure that the tongue is central. Use a mirror to ensure the tongue is straight in the mouth. Practice increasing the tonguing speed using Spit Buzz. Hold long notes in front of the mirror ensuring the tongue position is correct at all times.
9) The tongue needs to be very strong to achieve the effect described above. To strengthen the tongue perform pressure exercises against a finger. Position a finger across the mouth to give the tongue something to push against. Push and hold until the tongue aches and cannot be held any longer.
8) Breakthrough – Concentrate on feeling a cushion of air pressing into the tongue. I obtained this when pushing the tongue far forward into the mouthpiece cup. It felt like the air in the mouthpiece cup was pushing back into the curled tongue, rather like pushing against a spring. Position the tongue over the complete mouthpiece cup so that it feels like it is sealing, hence keep the tongue wide to provide a good seal.
7) Practice by playing quietly, especially when tonguing. This will enhance the tonal quality and also enhance the ability to strike each note in the center.
6) When ascending into the upper register try to trap the sides of the tongue between the back upper and lower teeth while still arching it. This will help to lock it into place and prevent it from receding.
5) Practice the articulation by tonguing 4 notes at a time on each note of a scale, gradually working upwards. Try to make the articulation smooth i.e. with very little gap between notes using a continuous breath. Practice very slowly at first until a smooth strike is obtained and then very gradually increase the speed ensuring no loss of quality.
4) The amount the tongue drops when done properly is almost imperceivable, causing virtually no movement of the trumpet bell. The tongue doesn’t actually stop making contact with the top teeth; it just releases some of the sealing pressure. This allows smooth quiet tonguing as well as powerful strikes.
3) Articulate by dropping the tongue down ever so slightly from the cutting edges of the top teeth but keeping the forward pressure of the tongue so that the pitch of the note does not waver during articulation.
2) Start by playing very long notes. These will tail out without any buzzing as the lips tire. Practice by starting with bottom C below the stave until you can blow continuously for 5 complete lung fulls of air. Then progress up the scale one note at a time. This will build the lip muscle strength and greatly increase endurance and tone.
1) The tongue should be touching the cutting edges of the top teeth at all times and should feel as if it is pushing out between the teeth into the mouthpiece cup. Never lift the tip of the tongue from the top of the bottom lip.
(The list is ordered with the most recent at the top to make it quicker and easier to see the latest additions).
30) Here is a bit more detail about the embouchure to help those starting out as well as more advanced players.
To get started is it worth following my Getting Started instruction but with the following clarification. In the initial relaxed position with the jaw open, teeth apart, the tip of the tongue, whilst in gentle contact with the bottom lip, doesn’t sit on top of it, but makes contact behind it. So, with your tongue in this position you should be able to rest your finger on top of your bottom lip and feel your tongue at the same height, touching behind it. Then relax your jaw to allow your teeth to close to where they would be when your are talking (so a relaxed open position). The tongue is then arched slightly so that it pushes into the back and cutting surfaces of the top teeth (about 10mm in from tip), but all the time keeping the tip (all the way across) in the same position touching bottom lip. If you were to try to push your finger into your mouth now the tongue would be felt rising behind the bottom lip as it arches up behind the top teeth. It is only my two front teeth cutting surfaces (approximately) that make contact with the tongue, and this where the articulation happens. When you articulate (and playing any notes, long or short) your two front top teeth cutting surfaces should never leave contact with your tongue. You stop the note by gently pushing your tongue up towards the roof of the mouth hence cutting off the air, then drop down again to start the next note. You will feel your tongue moving when you do this, but of course it is a much reduced movement from what you have been used to when playing without TCE.
Practice groups of 5 articulations as fast as possible followed by one long note, concentrating on keeping the tongue in the correct position. When you play the long note you should feel lots of vibration through your tongue, and top and bottom lips as this is a large vibration system you have created. Practice all this loudly, not soft, the ability to play soft will come later with practice. Practicing loudly is much easier initially as creates a bigger vibration feel in the mouth and is much better for getting the feel of what is going on.
29) Made significant progress recently by working more on my articulation, particularly by practicing playing groups of 5 notes (5 articulations on each individual scale tone) as fast as I can, working up the scale in semi-tones from bottom C up to top (high) C. The notes must be practiced with maximum attack and as fast as possible. This ensures that the tongue is placed in the optimum position, otherwise both the speed and attack quality will be affected. Basically, if the tongue recedes, rather than staying forward, the speed and attack quality will suffer. Playing groups of 5 (or no more than 5) is important because the tongue has a tendency to recede as you articulate continuously. By practicing groups of only 5 notes (or no more than 5), the tongue can be reset (to correct forward position) at the start of each group of 5 notes, thus ensuring the correct position is maintained; and achieves the desired re-enforced learning. I chose 5 notes rather than 4 because a typical phrase when playing pieces of music is often 4 notes that then lead into the next phrase i.e. ta,ta,ta,ta, taa.
So, when you practice this exercise always ensure you pay attention to starting each phrase with the tongue pushed forward. Listen to the attack quality, and work to achieve consistency and speed as you ascend. It will be harder at first to achieve the same quality and speed for the higher notes of the scale, but with continued practice I promise this will get better and better, as well as your overall performance sound.
28) I would like to re-emphasise the importance of the note made earlier in post 22. Hence to curl the bottom lip up over the bottom teeth. I have found that not only the upper, but also the lower register is significantly improved by doing this. Hence, always strive for this position of the bottom lip throughout the complete range of the instrument. Your sound will become more powerful and centred, with an improvement in overall intonation (high and low), as well as endurance. In particular, an improvement in upper register endurance and clarity will result.
27) As I have progressed more with this wonderful technique, I have found that by far the best exercise without an instrument is to practice lots of Spit Buzzing. Practice single tonguing with emphasis on the “Tongue Stop” as well as double tonguing ensuring smooth double tongue articulation. In addition, practice slurring up as high as you can by creating maximum tongue curl and opening the teeth. This will greatly increase the tongue strength and give you a more powerful upper register. Spit Buzzing is the only non instrument exercise I do now.
26) The Tongue Stop - It has become increasing clear to me as I have progressed with the Superchops embouchure of the importance of the correct use of the tongue for stopping each note; what is known as the Tongue Stop. The end of every note should be performed by pushing the tongue forward to stop the air flow, not by stopping the air with the lungs. The lungs should maintain abdomen air pressure at all times, with the tongue acting as the outlet valve for both starting and stopping the flow. It is all too easy to overlook this technique when developing the Superchops method, but when correctly applied, it will greatly enhance articulation power, accuracy, and speed, as well as pitch control.
Practice slow articulation with a reasonable gap between notes to get the feel of the tongue pushing hard forward to stop each note. The tongue remains in this position until the start of the next note when it releases to form a precise “pop” articulation strike. The tongue will ache with the effort and quickly get stronger the more you practice. Once you have developed the correct feel, gradually increase the speed, but always go back to practicing slowly to re-enforce the learning and feel of this most important articulation method.
25) I have discovered that the tongue strength is greatly enhanced, as well as general pitch accuracy, by practicing starting each note by just blowing, hence no articulation. Playing in this way (just a simple scale with separated notes; played quietly) forces you to start each note with the tongue firmly forward, and is excellent for developing the correct feel of the forward tongue during playing. This is another exercise that makes my tongue ache and feel very thick after playing, which proves that it is excellent as a tongue strengthening work out. I have only been practicing this way for two weeks and have already noticed a significant improvement in both my endurance and pitch accuracy.
24) I slightly chipped one of my teeth recently, and found that my tongue was getting sore when I played (ok now). This made me realise that I am actually lightly placing the tip of the tongue on top of the bottom teeth, and curling it forward onto the bottom lip. My bottom teeth are hence acting as both a support and anchor for the underside of the tongue tip and the bottom lip is pulled in so that the curled tongue rests on top.
I believe my tongue has migrated over time to this position as I have improved, and that it helps with the accuracy and speed of articulation.
Interestingly, my embouchure is now exactly the same as shown in Jerome Callet’s Master Superchops DVD embouchure diagram (disc 2), which clearly shows the tongue tip curling down onto the top (cutting edges) of the bottom teeth.
23) In addition, or instead of that described in (9) above, I have now found a new way to strengthen the tongue (and bottom lip) without the need for an instrument or mouthpiece. Pull the bottom lip up over the bottom teeth, curling into the mouth as much as possible. Then place the tongue on top of the bottom lip and form the Superchops embouchure. Keep the teeth apart, and curl the tongue as much as possible, pushing it up into the roof of the mouth, and forward against the inside of the top teeth, as well as down hard onto the bottom lip. Hold in this position to make the tongue and bottom lip muscles ache. I have found that this even helps when performed immediately before playing, and helps to develop a powerful upper register.
22) When ascending into the upper, and extreme upper register, pull (curl) the bottom lip hard up over the bottom teeth. This helps to keep the teeth wide open when the tongue is generating maximum curl, and creates a very powerful sound.
21) Breakthrough - Found that my tongue was retracting too much during articulation. Practice playing long notes that run into each other ensuring as smooth as possible. Then play taa ta taa ta taa rhythm to develop articulation speed, keeping the gap between the notes to a minimum. This works really well. Makes the tongue ache which shows it is working hard.
20) As well as practising double tonguing described above, practice very short sharp tonguing, creating a pop sound. Do this as fast as possible (triplets) making sure each note is properly centred. This is good for developing attack and speed, also helps develop the tongue strength.
19) Breathing – (I appreciate there are other well proven breathing methods, but this worked for me). Very important to breath properly from the lower abdomen. Practice by taking deep breaths just before the start of playing, tense the lower abdomen muscles used to push the air through the instrument and continue to feel the muscles pushing during playing. Never use the upper chest muscles. Do breathing exercises expelling as much air as possible while using the lower abdomen muscles. Concentrate on not taking quick extra breaths from the upper chest, must only do this from the lower abdomen. You must feel the stomach extend when taking quick extra breath. Practice taking fast breaths to develop the technique.
18) Use double tonguing as a means of developing a good forward tongue position. Practice with double-tonguing as much as possible while continually forcing the tongue forwards. Concentrate on minimising the amount of tongue movement between notes whilst articulating very slowly. Gradually increase the speed, but only when very smooth articulation is obtained where the notes almost run into each other. Start on bottom C playing 4 notes the same and then ascend the scale, 4 notes each. Move up and down the scale like this for as long as possible, rest and then continue. The tongue will start to feel very thick after just a few days, and will quickly become strong and able to support and further develop the correct Superchops forward position. Always strive for maximum forward position with sufficient curl to feel the roof of the mouth with the back of the tongue and the inside of the top teeth with the tongue centre.
17) When double-tonguing, also practice by tonguing as hard as possible to give a solid pop sound. When ascending, push the tongue forward the same as when slurring upwards so as to maintain a smooth sound and perfect pitch. Practice by slurring first and then, while the feeling of slurring is fresh in the mind, double tongue the same phrase, concentrating on the same feel; forward movement of the tongue.
16) Practice tonguing in groups of 4 articulated notes with accent on first of each 4. Gradually build up speed, using first of 4 notes as means of driving forward in speed.
15) Practice the above by playing long low notes (F above bottom C) making sure the tongue is kept as far forward as possible. Gradually escalate up the scale playing long notes with tongue as far forward as possible pushing hard against the top teeth. This will greatly increase the strength of the tongue.
14) To get tonguing smooth and fast practice quiet tonguing with absolute minimum gap between notes so they almost run into each other. This ensures minimal tongue movement between notes and improves smoothness and speed. Do the same with double tonguing keeping the articulation soft. This is best achieved by keeping tongue lightly touching top teeth at all times. Don’t let it recede or it will make smooth double tonguing much more difficult. Practice keeping point of contact with the top teeth as far forward as possible; somewhere around the middle of tongue.
13) Keep the sides of the mouth pulled in at all times producing maximum pucker. This makes the upper register easier and improves tonal quality. Practice long quiet G’s (below middle C).
12) Breakthrough – Keep tongue position as above and practice slurring up by just curling the tongue; pushing against the inside of the top teeth as described above. Use the same valves e.g. 1&3 to slur right up into the top register. Trap the back of the tongue between the back teeth like an anchor making it firmer. Practice with the tongue in this position in all registers. I notice the articulation got much faster and the flexibility much better as only the front part of the tongue moves. Almost managed to slur up to a super C !!
11) Breakthrough – Make sure the tongue position is such that the curled tongue presses against the inside of the top teeth AND the gums. I should feel the gum when articulating, which ensures that the tongue is well forward and very curled. This gives much better attack and faster articulation. The Spit Buzz sounds much more like Callet when doing this.
10) Practice Spit Buzzing all the time and make sure that the tongue is central. Use a mirror to ensure the tongue is straight in the mouth. Practice increasing the tonguing speed using Spit Buzz. Hold long notes in front of the mirror ensuring the tongue position is correct at all times.
9) The tongue needs to be very strong to achieve the effect described above. To strengthen the tongue perform pressure exercises against a finger. Position a finger across the mouth to give the tongue something to push against. Push and hold until the tongue aches and cannot be held any longer.
8) Breakthrough – Concentrate on feeling a cushion of air pressing into the tongue. I obtained this when pushing the tongue far forward into the mouthpiece cup. It felt like the air in the mouthpiece cup was pushing back into the curled tongue, rather like pushing against a spring. Position the tongue over the complete mouthpiece cup so that it feels like it is sealing, hence keep the tongue wide to provide a good seal.
7) Practice by playing quietly, especially when tonguing. This will enhance the tonal quality and also enhance the ability to strike each note in the center.
6) When ascending into the upper register try to trap the sides of the tongue between the back upper and lower teeth while still arching it. This will help to lock it into place and prevent it from receding.
5) Practice the articulation by tonguing 4 notes at a time on each note of a scale, gradually working upwards. Try to make the articulation smooth i.e. with very little gap between notes using a continuous breath. Practice very slowly at first until a smooth strike is obtained and then very gradually increase the speed ensuring no loss of quality.
4) The amount the tongue drops when done properly is almost imperceivable, causing virtually no movement of the trumpet bell. The tongue doesn’t actually stop making contact with the top teeth; it just releases some of the sealing pressure. This allows smooth quiet tonguing as well as powerful strikes.
3) Articulate by dropping the tongue down ever so slightly from the cutting edges of the top teeth but keeping the forward pressure of the tongue so that the pitch of the note does not waver during articulation.
2) Start by playing very long notes. These will tail out without any buzzing as the lips tire. Practice by starting with bottom C below the stave until you can blow continuously for 5 complete lung fulls of air. Then progress up the scale one note at a time. This will build the lip muscle strength and greatly increase endurance and tone.
1) The tongue should be touching the cutting edges of the top teeth at all times and should feel as if it is pushing out between the teeth into the mouthpiece cup. Never lift the tip of the tongue from the top of the bottom lip.
Mouthpiece Selection
The choice of mouthpiece for this method of playing is very important. A mouthpiece with a shallow cup works far better than one with a deep cup. I have tried many different mouthpieces in both the Bach and Schilke range and settled on the Schilke 10A4 for a period of time, but then decided to try something with a wider rim / cup to enhance control. Mouthpieces that work extremely well are the Yamaha Bobby Shew Lead, and surprisingly, the Kelly Screamer, but with a metal enhancer fitted to give it improved mid to low resonance (see photo). The best for me now however is the Warburton 2M cup with a No6 Star (*) backbore. I have in the past played some time on the Callet mouthpieces that are available for Superchops, namely the Superchops 1 (SC1) and the Superchops 2 (SC2) and Superchops 3 (SC3 - best one), but found that the intonation did not suit my current choice of instrument (Conn Vintage One).


Choice of Instrument
I now play a Conn Vintage One with a Warburton 2M mouthpiece top and No6 star (*) backbore. This is a great balanced combination for both sound and intonation. Lovely classical tone with top end brilliance. Just ordered a rose brass bell version too!
Tuning, Centre Slotting - The Harmon Trick
It is very important to always pitch each note in the centre of your instruments slot band.
If you pitch a note too low, or too high there will be a loss of resonance resulting in a significant loss of power and tone. Having the right equipment to help with this centre pitch slotting, i.e. a trumpet that has been designed to have well defined slotting, coupled with a balanced mouthpiece, is obviously beneficial, but not a complete solution in itself.
When you need to be in tune with other players; i.e. when playing in a band or orchestra, it is very important not to get pulled out of the centre slot band for your instrument, hence your instrument's tuning needs to be set correctly to enable you to play in tune and on resonance. Often players hear the tuning note they need to match, and their ear locks on to this enabling them to play ‘in tune’ even though the instrument tuning is not set correctly, hence the note can be forced (pulled) off slot centre. Playing like this will significantly reduce endurance, as the player has to work harder at producing a good sound with sufficient power.
A very neat and simple way to help ensure you are pitching in the centre of each note on the trumpet is to use a good quality Harmon mute with the stem removed. With the stem removed, the Harmon mute will only buzz loudest when you play in the centre of the pitch. If you bend the note up or down from centre, the buzz will get quieter, and if you bend it far enough it will stop completely, making a dull sound.
When tuning up at the start of a rehearsal or concert, I recommend you test your tuning in this way, and re-check occasionally, especially with changes in ambient temperature.
Subscribe to:
Posts (Atom)
